{“a”:”b”}
My journey creating Remonitor – A web app service for monitoring devices.
What is remonitor web service?
Remonitor is a service to allow an admin to monitor multiple groups of devices (examples: employees, students and children). The service enables the admin to get user’s device usage stats, login logout times and screenshots of the device screen at set intervals for monitoring.
The project was inspire by a friend of mine who wanted a way to monitor two computers being used by their employees at work.
With remontoir you can use it for a variety of ways:
- Monitor employees at work or even remotely by getting their login and logout times, active time and timed screenshots.
- Monitor students learning remotely to verify that they attend sessions and are actively engaged.
- Personal monitoring of you device usage and tracking you productivity on a device.
The project was made by Moses Mwangi (msofteng) with help from friends.
I have always wanted to create a service that helps solve real world problems and when my friend suggested the issue of monitoring his employees I knew this was my opportunity to achieve this desire.
I visited my friends workplace and he warmly introduced me to their employees and explained why I was there. (My friend is a very open person and likes doing things in an official manner). At the work place I was able to see the problem first hand which gave me a clear project requirements. I sketched a rough system architecture with my friend and discussed further about the future of the project and agreed that I would work on it and come up with a prototype first before further discussions.
The project was daunting at first because I had to combine several technologies from cloud to web and desktop clients. I had to learn new frameworks like react and flutter on the fly top come up with solutions for different parts of the project. The project start was slow as I had to do a through research on technologies to use and decide on a approach to implement it.
Results of your project.
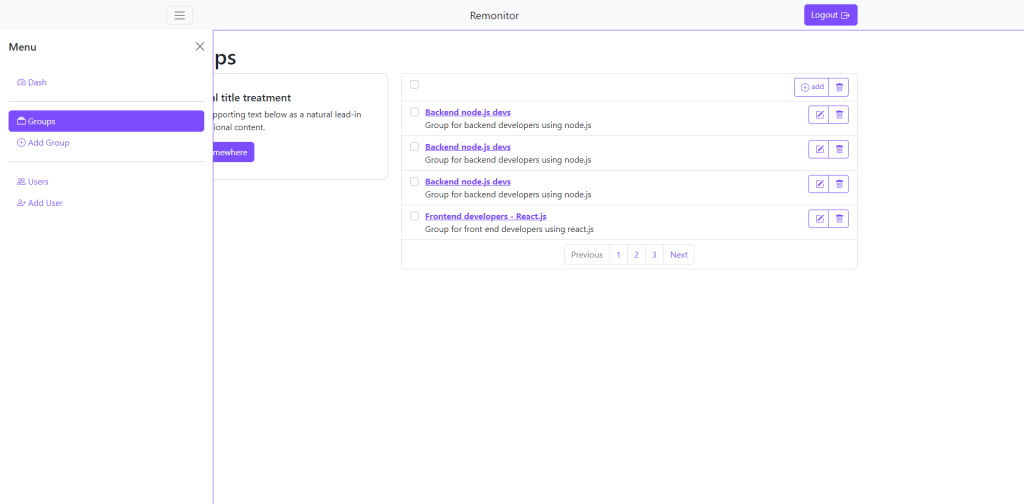
I developed the admin dashboard using React.js, Bootstrap and SASS. The backend for the project was hosted in AWS Cloud using Node.js running in Lambda and DynamoDB. The client desktop application was made using flutter for desktop with platform specific implementation using C++ language for windows to have access to native APIs.
Features accomplished
- Responsive design of the admin web application.
- Cross platform client desktop application.
What I’ve learned from the project.
Planning ahead in detail really helps with getting the project done and avoid deadlock.
About me.
👋Greetings, I’m Moses, a Software Engineer excited about combining my passion for solving problems and developing quality software essential to solving challenges efficiently.
GitHub project link https://github.com/MosesSoftEng/remotenitor
Linked link https://www.linkedin.com/in/mosessofteng/
Create and publish a blog post to WordPress from office word 2021.
Requirements to create and publish post to WordPress blog from office word 2021.
-
A WordPress blog;
- Account username, example digitwrite.
- account password.
- hostname/ domain, example digitwrite.wordpress.com
- Office Word 2021 installed
[Step 1] Connect Office Word to your WordPress Blog.
-
Open Office Word, New, Select Blog Post template. If there is not Blog Post template, search for it in the template search bar.

Figure 1: Create a Blog Post Word document
- Choose register account in the dialog window
-
Enter your WordPress Blog details as shown below and press OK button

Figure 2: Setting up WordPress Blog account details in Word
- If the details are correct, the dialog window will close and open a blank blog post window.
[Step 2] Create and publish a blog post
-
You can enter your blog post title and content, once done click publish or save as draft.

Figure 3: Write and publish a WordPress Blog
Errors that you may encounter.
[Solved] Word cannot register your account.
Solution 1: Ensure you enter the correct WordPress Blog details.
Counter check your blog account credentials, username, password and blog link.
Note! The blog link should be https and not http. That is;
https://digitwrite.wordpress.com/xmlrpc.php Wrong!
https://digitwrite.wordpress.com/xmlrpc.php Correct! Note the s after http
2022 How to host a static website in AWS Cloud using s3
Step by step guide on how to host your static website on AWS cloud using free tier pricing.
Step : Create an AWS account
Step : Create Simple Storage Service (S3 Bucket) where you will upload your website files.
Using AWS Management Console.
Go to S3 Dashboard.
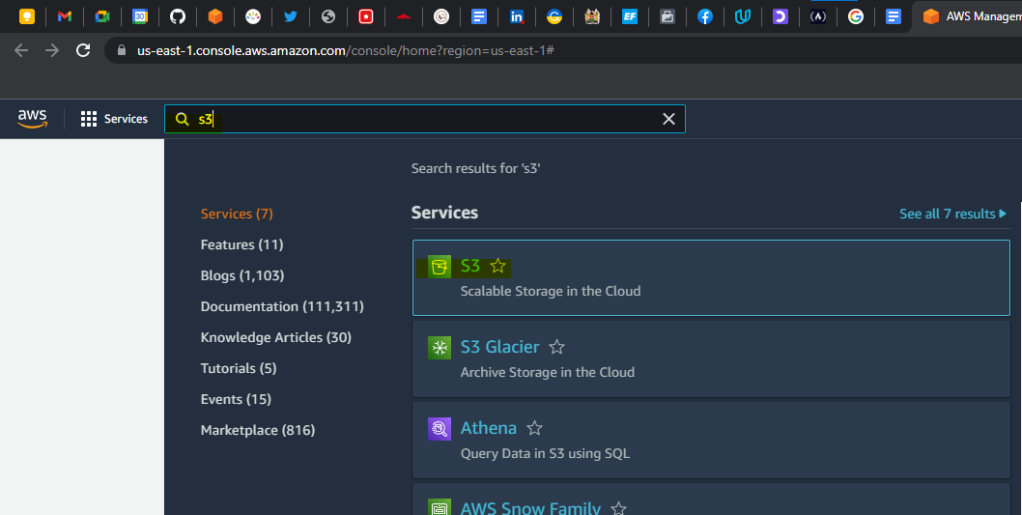
Open S3 Dashboard https://s3.console.aws.amazon.com/s3 or in AWS dashboard search for S3 in Search for service.. search box and click S3, see image below.
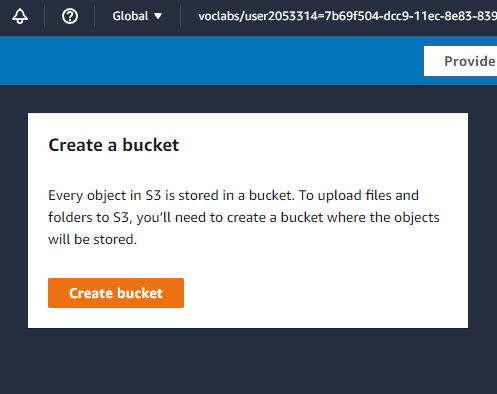
Click Create bucket button
Provide bucket settings details
Bucket name
Give bucket a global unique name. You can use the format below. AWS Account ID can be copied from account details by clicking it at top right corner of dashboard navigation bar.
my-[AWS Account ID]-bucketnameRegions
Choose region of choice or use default region assigned.
Block Public Access settings for this bucket
Uncheck, Block all public access to allow public access to our uploaded website files via S3 object URL. Check the confirmation warning below it.
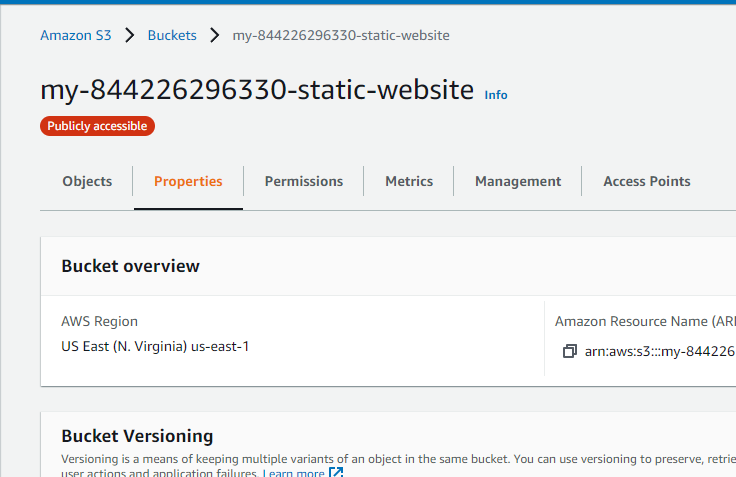
Bucket Versioning
Disable to avoid additional charges, but you can enable if you require version of your files be created for recovery purposes.
Other settings
Tags – add tags to help you identify the created S3 resource in other services.
Encryption – Provide added security to the contents of the S3 by encryption at rest.
Object Lock – Prevent edits or deletion of S3 contents for set duration write-once-read-many (WORM) model.
Click Create bucket button
Upload files to created S3 bucket.
Click the created S3 bucket in S3 Dashboard https://s3.console.aws.amazon.com/s3
Click upload button, choose add file to upload a file and add folder to upload a folder and it’s contents.
Storage class
Choose Standard
Set IAM Policy for Created S3 Bucket.
In permissions tab, edit bucket policy, paste the code below and replace s3-bucket-name with you bucket name.
{
	"Version": "2012-10-17",
	"Statement": [
         {
           "Sid":"AddPerm",
           "Effect":"Allow",
           "Principal": "*",
           "Action":["s3:GetObject"],
           "Resource":["arn:aws:s3:::s3-bucket-name/*"]
         }
	]
}
Configure S3 Bucket.
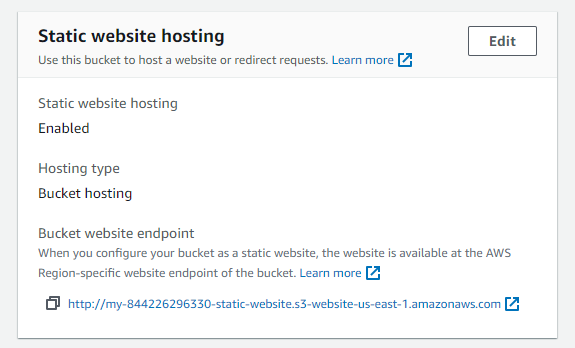
In properties tab, scroll to Static website hosting section and click edit.
Static website hosting
Enable
Hosting Type
Host a static website
Set index and error pages
Provide your default website page file e.g. index.html and error page.
Click save.
A link to the website will be generated
Distribute Website via AWS CloudFront.
Open CloudFront dashboard https://console.aws.amazon.com/cloudfront or n AWS dashboard search for CloudFrontin Search for service.. search box and click CloudFront link
Click the Create a CloudFront Distribution button.
Origin domain
Paste your static website link from previous step
Enable Origin Shield
No
Viewer protocol policy
Redirect HTTP to HTTPS
Other settings leave as default.
Create distribution.
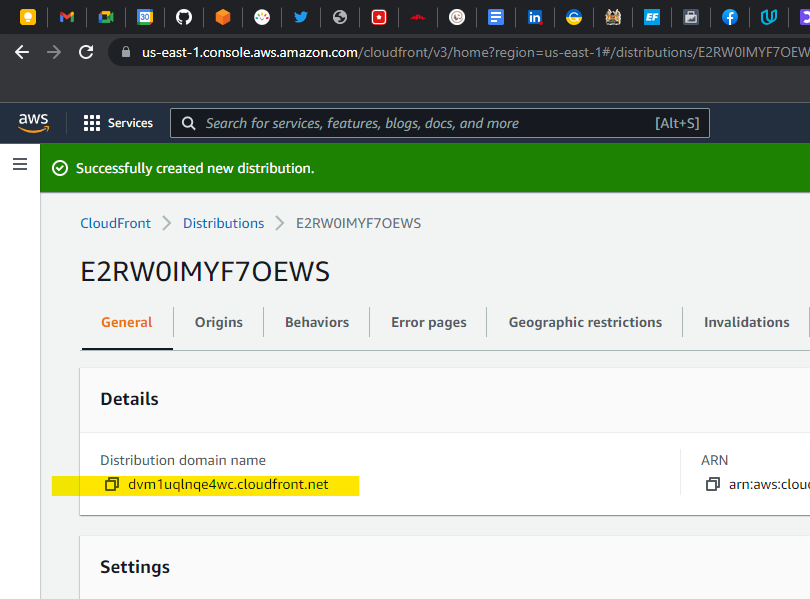
Copy the Distribution domain name under General tab of the distribution created
CloudFront may take 10-30 minutes (or more) to cache the S3 page.
Three ways to access the static website
Using the cloud front distribution domain.
https://dvm1uqlnqe4wc.cloudfront.net
Using the bucket website-endpoint.
http://<bucket-name>.s3-website-us-east-1.amazonaws.com/
Using the S3 object URL
http://<bucket-name>.s3.amazonaws.com/index.html
Notes
You can make the bucket private and use the cloud front distribution domain to access it and deny the other URLs: S3 objects and website-endpoint.
Decimal, Binary, Hexadecimal, and Octal Number Systems simply explained.
What is the Number System?
A consistent way of representing numbers using symbols (Numbers and letters). There are four main types of Number Systems
| Number System | Base number | Prefix Notation | Post Notation | Brackets Notation | Decimal Number | Symbols used |
| Decimal Number System | 10 | No notation | No notation | (23)10 | 23 | 0 to 9 |
| Binary Number System | 2 | 0b e.g. 0b1101 | B e.g. 1101B | (1101)2 | 13 | 0 and 1 |
| Octal Number System | 8 | 0 e.g. 0121 | O e.g. 121O | (121)8 | 81 | 0 to 7 |
| Hexadecimal Number System. | 16 | 0x 0x1B | H e.g. 1BH | (1B)16 | 27 | 0 to 9 then A to F |
Decimal Number System. Base-10.
Number system that uses the 10 digits symbols 0,1,2,3,4,5,6,8 and 9 to represent numbers with 10 as the base number.
Example: Convert 691 to decimal number system.
| Division | Quotient | Remainder |
| 691 ÷ 10 | 69 | 1 |
| 69 ÷ 10 | 6 | 9 |
| 6 ÷ 10 | 0 | 6 |
691 represented in decimal number system is 691. (Reading remainder the values from bottom to top. Therefore the number system we use on a daily basis is the decimal number system! This can also be done using power form as (1 x 100) + (9 x 101) + (6 x 10²) = 691
Binary Number System. Base-2.
Number system that uses the digits symbols 0 and 1 to represent numbers with 2 as the base number.
Convert Decimal to Binary Number System.
Example: Convert 691 to binary number system.
| Division | Quotient | Remainder |
| 691 ÷ 2 | 345 | 1 |
| 345 ÷ 2 | 172 | 1 |
| 172 ÷ 2 | 86 | 0 |
| 86 ÷ 2 | 43 | 0 |
| 43 ÷ 2 | 21 | 1 |
| 21 ÷ 2 | 10 | 1 |
| 10 ÷ 2 | 5 | 0 |
| 5 ÷ 2 | 2 | 1 |
| 2 ÷ 2 | 1 | 0 |
| 1 ÷ 2 | 0 | 1 |
691 represented in binary number system is Ob1010110011! (Reading remainders values from bottom to top in the table).
Converting Binary to Decimal Number System
Example: Convert 0b1010110011 to decimal number system.
(1 x 20) + (0 x 21) + (1 x 22) + (0 x 23) + (1 x 24) + (1 x 25) + (0 x 26) + (0 x 27) + (1 x 28) + (1 x 29) = 691
| Division | Quotient |
| 0 x 2 + 1 | 1 |
| 1 x 2 + 0 | 2 |
| 2 x 2 + 1 | 5 |
| 5 x 2 + 0 | 10 |
| 10 x 2 + 1 | 21 |
| 21 x 2 + 1 | 43 |
| 43 x 2 + 0 | 86 |
| 86 x 2 + 0 | 172 |
| 172 x 2 + 1 | 345 |
| 345 x 2 + 1 | 691 |
Uses of Binary Number System.
- Computers use the binary number system to manipulate and store all of their data. The computer uses switches which can be either on (1) and off (0) to save information.
Octal Number System. Base-8.
Number system that uses the digits symbols 0 and 7 to represent numbers with 8 as the base number.
Convert Decimal to Octal Number System.
Example: Convert 691 to octal number system.
| Division | Quotient | Remainder |
| 691 ÷ 8 | 86 | 3 |
| 86÷ 8 | 10 | 6 |
| 10÷ 8 | 1 | 2 |
| 1÷ 8 | 0 | 1 |
691 represented in octal number system is O1263. (Reading remainders values from bottom to top in the table)
Converting Octal to Decimal Number System
Example: Convert O1263to decimal number system.
(1 x 80) + (2 x 81) + (6 x 82) + (3 x 83) = 691
Hexadecimal Number System, convert Decimal to Hexadecimal Number System.
Number system that uses the symbols 0 and 9 then from A to F to represent numbers with 16 as the base number.
| Number | Hexadecimal Symbol |
| 1 | 1 |
| 2 | 2 |
| 3 | 3 |
| 4 | 4 |
| 5 | 5 |
| 6 | 6 |
| 7 | 7 |
| 8 | 8 |
| 9 | 9 |
| 10 | A |
| 11 | B |
| 12 | C |
| 13 | D |
| 14 | E |
| 15 | F |
Example: Convert 691 to Hexadecimal number system.
| Division | Quotient | Remainder | Hexadecimal Representation of reminder |
| 691 ÷ 16 | 43 | 3 | 3 |
| 86÷ 8 | 2 | 11 | B |
| 10÷ 8 | 0 | 2 | 2 |
691 represented in octal number system is 0x2B3. (Reading remainders values from bottom to top in the table) This can also be done using power form
Converting Hexadecimal to Decimal Number System
Example: Convert 0x2B3 to decimal number system.
(2 x 160) + (11 x 161) + (3 x 162) = 691
Binary to Hexadecimal Conversions.
Method 1: Convert to decimal then to Hexadecimal.
See heading convert binary to decimal number system then convert decimal to hexadecimal number system.
Method 1: Group binary into fours from the right then then convert each group to Hexadecimal.
Example: Convert 0b1010110011 to hexadecimal
Step 1: Group into fours from right, add leading zeros to leftmost group if the bits are not four.
0010 1011 0011
Step : Convert each group to hexadecimal using the table.
| Decimal | Binary | Hexadecimal |
|---|---|---|
| 0 | 0000 | 0 |
| 1 | 0001 | 1 |
| 2 | 0010 | 2 |
| 3 | 0011 | 3 |
| 4 | 0100 | 4 |
| 5 | 0101 | 5 |
| 6 | 0110 | 6 |
| 7 | 0111 | 7 |
| 8 | 1000 | 8 |
| 9 | 1001 | 9 |
| 10 | 1010 | A |
| 11 | 1011 | B |
| 12 | 1100 | C |
| 13 | 1101 | D |
| 14 | 1110 | E |
| 15 | 1111 | F |
0x2B3 is the hexadecimal equivalent for 0b1010110011
Hexadecimal to Binary Conversion.
Method 1: Convert the hexadecimal to decimal then to binary.
See heading convert hexadecimal to decimal number system, then convert decimal to binary number system.
Method 2: Convert each hexadecimal bit to binary using the table 7.
Example: Convert 0x2B3 to binary
For each hexadecimal value, replace it with it equivalent binary value e.g. repalce 2 with 0010 from the table 7.
0010 1011 0011
Bitwise Manipulation in Binary Number System.
| A | B | A|B | A&B | A^B | ~A |
| 0 | 0 | 0 | 0 | 0 | 1 |
| 0 | 1 | 1 | 0 | 1 | 1 |
| 1 | 0 | 1 | 0 | 1 | 0 |
| 1 | 1 | 1 | 1 | 0 | 0 |
Bitwise OR Operator |
Outputs 1 if at least one of the bits of the two operands is 1 otherwise 0.
Example: 00001100
| 00011001 results in
00011101
Bitwise AND Operator &
Outputs 1 if both bits of the two operands is 1 otherwise 0.
Example: 00001100
&00011001 results in
00001000
Bitwise XOR (exclusive OR) Operator ^
Outputs 1 if the bits of the two operands is opposite.
Example: 00001100
^ 00011001 results in
00010101
Bitwise complement Unary Operator ~
Outputs 1 if the bit is 0 and vise versa.
Example: ~00100011
11011100
Right shift operator >>
Shifts all bits towards right by certain number of specified bits.
Example:
212 = 11010100
212>>2 = 00110101
Right shift operator <<
Example
212 = 11010100
212<<1 = 110101000
Use of bitwise manipulators.
- A computer uses bitwise operators to compute all arithmetic operations.
- In situation where resources is limited you can make use of bitwise operator as they are more resource efficient e.g. programming microcontrollers.
- Saving Booleans in bits to save memory.
- Bitwise manipulations are faster then decimal manipulations.
Bit Manipulation in Hexadecimal Number System.
Convert the from hexadecimal to binary number system then perform the bit manipulation then convert back to binary. Zeros are used to fill vacant bit positions.
References
- https://ryanstutorials.net/binary-tutorial/#binary
- https://www.cuemath.com/numbers/hexadecimal-number-system/
- https://www.bbc.co.uk/bitesize/guides/zd88jty/revision/5
- https://ryanstutorials.net/binary-tutorial/binary-conversions.php
- http://facweb.cs.depaul.edu/sjost/it212/documents/binhex.htm
- http://facweb.cs.depaul.edu/sjost/it212/documents/binhex.htm
- https://flexiple.com/developers/decimal-to-binary-conversion#:~:text=To%20convert%20a%20binary%20integer,and%20add%20the%20current%20digit).
- https://blog.tarkalabs.com/real-world-uses-of-bitwise-operators-c41429df507f
Lightspeeed Web Optimization.
Font Icons.
Google material font icons cause layout shifts due to words inside the <i> tag, use Font Awesome or Fork Awesome.
Jupyter Notebook
Literate Programming – documentation is written as a narrative alongside the code.
A Notebook is an application that allows you to combine text/ comments, math equations, code, and visualizations in the same document.
upyter Notebook is such an application that runs on the web. Saves files with the extension .ipynb
Check if Jupyter Notebook is installed.
How to install Jupyter Notebook.
Execute the following command in a Shell Terminal,
jupyter --version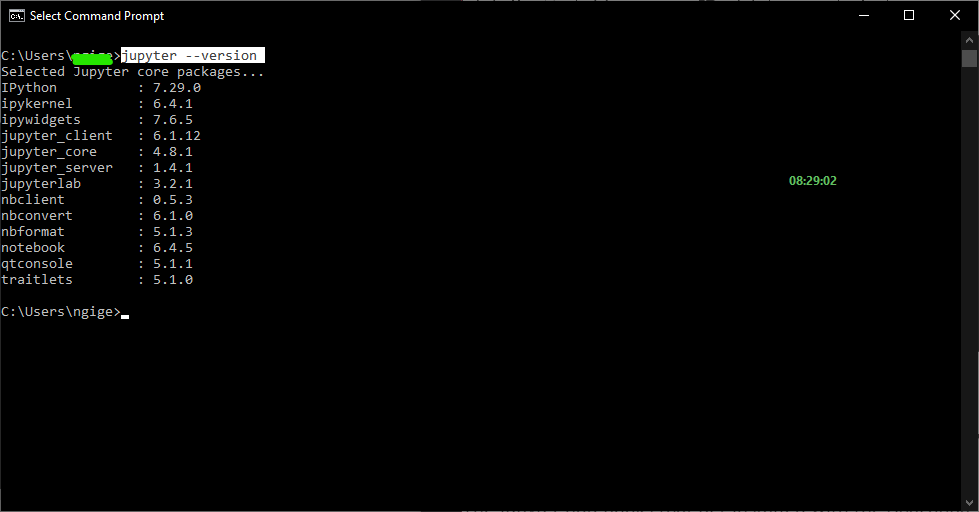
Install using Anaconda Distribution.
The Jupyter notebooks that get installed with the Anaconda distribution. How to install Anaconda Distribution.
Install using pip.
Execute the following command in a Shell Terminal,
pip install notebookor
pip install jupyter notebookTo run Jupyter Notebook Server.
Run a Shell Terminal, navigate to the directory where you want to save the notebook files. Then execute the following command,
jupyter notebook
This will start a Jupyter Notebook server in the current directory and open a browser tab with a localhost address e.g. http://localhost:8889 Additional servers will increase the port number (The last digits after : in the localhost URL). The server interface shoul look as below.

Click on “New” to create a notebook (Python 3 kernel), text file, folder, or terminal.
Install Notebook Conda Package.
Execute the following command,
conda install nb_conda
Using Jupyter Notebook

Useful Links
- Service to renders notebooks from your GitHub repo or from other notebooks.
- List of available kernels in Jupyter.
Magic Keywords
Magic keywords are special commands you can run in cells that let you control the notebook itself or perform system calls such as changing directories. For example, you can set up matplotlib to work interactively in the notebook with %matplotlib.
$% or %% for line magics and cell magics, respectively.
Debugging in the Notebook
%pdb – turns on the interactive debugger. To quit the debugger, simply enter q in the prompt.
Useful Links
Converting Notebooks
# Install the package below, if not already
pip install nbconvert
jupyter nbconvert --to html mynotebook.ipynb
Supported output FORMAT could be either of the following (ignore case):
- HTML,
- LaTeX,
- PDF,
- WebPDF,
- Reveal.js HTML slideshow,
- Markdown,
- Ascii,
- reStructuredText,
- executable script,
- notebook.
Slideshows

Running the slideshow
To create the slideshow from the notebook file.
jupyter nbconvert notebook.ipynb --to slides
To convert it and immediately see it, use
jupyter nbconvert notebook.ipynb --to slides --post serve
Python package managers PIP Anaconda
Package managers are used to installing libraries and other software on your computer.
Pip can install both Python and non-Python packages. Pip can install any package listed on the Python Package Index (PyPI).
Python Anaconda Distribution – A package manager and virtual environment manager.
Anaconda is a package and environment manager for Python. It is used to install, upgrade, or uninstall packages and environments focused on data science.
How to install Anaconda Distribution on Windows 10.
a. Check if Anacoda is installed using GIT BASH terminal.
Open GIT BASH TERMINAL and execute the command below,
conda --versionIf Anaconda is not installed you will get the output,

bash: $: command not foundIf Anacoda is installed, you will get the output,

conda 4.10.3
b. Download and install Anacoda.
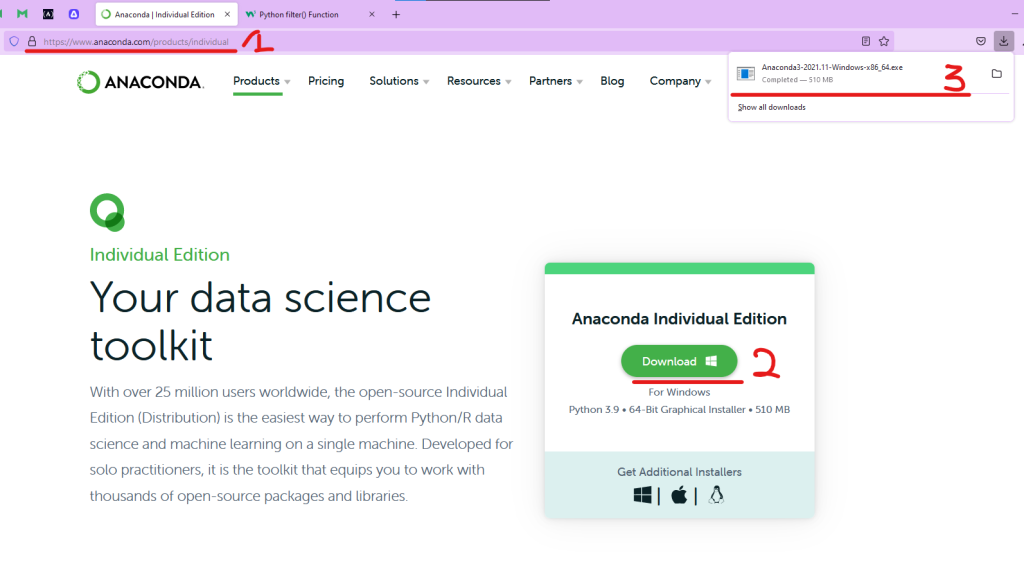
- Download Anacoda from the link https://www.anaconda.com/products/individual
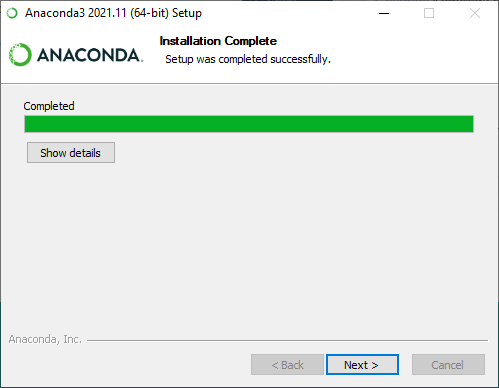
- Run and install the downloaded executable file (Anaconda3-2021.11-Windows-x86_64.exe *name of file may be different)
- In advanced installation window, check the option Add anacoda3 to my PATH environment variable.

- Leave every other options as default and press next until the installation is complete.

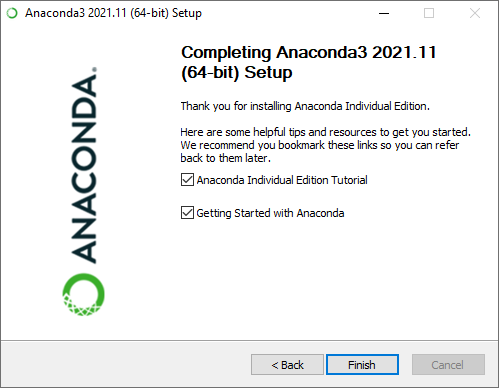
- Close and reopen your GIT BASH Terminal and go to step a above to check if Anacoda is installed propely.
How to Install a package using Anaconda package manager.
In Anaconda Terminal, execute the command,
conda install PACKAGENAMEWhere PACKAGENAME is the name of the package you want to install. All Anaconda Packages List.
How to Install a specific package version using Anaconda package manager.
conda install PACKAGENAME=X.XXWhere X.XX is the version number.
How to Install multiple packages in one command using Anaconda package manager.
conda install PACKAGENAME PACKAGENAME PACKAGENAMEHow to remove a package using Anaconda.
conda remove PACKAGE_NAMEHow to update a package using Anaconda.
conda update PACKAGE_NAMEHow to search for a package.
conda search *SEARCH_TERM*List all commands available in conda.
conda listConda Command reference guide.
Update all packages and environments.
conda upgrade conda
conda upgrade --all
execute – type a command and press enter key.
Create a new Python Environment in Anaconda Distribution.
To list available Python versions in a Terminal/ Anaconda Prompt, execute the command,
conda search python
or
conda search --full-name python
In a Terminal/ Anaconda Prompt, execute the below command,
conda create -n py37 python=3.7 anaconda
In the above command, we created a Python version 3.7.0 environment.
Check which Python environment is active.
python --version
List, Activate and Deactivate Python environment.
To see available environments, execute the command,
conda env list
conda activate py37
Where py37 is the name of the environment.
Deactivate current active environment use the command,
conda deactivate
Machine Learning with Tensor Flow.
Machine learning is a computer’s ability to recognize patterns in data and make decisions/ predictions by itself, instead of using hard-coded rules/ decisions (ifs). Rules are based on statistical distributions instead of human efforced if-else statements. Models made by ML leave a why question on why they were made.
Branches of machine learning.
- Supervised machine learning.
- Unsupervised machine learning.
- Reinforcement machine learning.
Supervised machine learning.
The algorithm studies labelled data, the determine which label should be given to new data based on observing patterns and associating those patterns to new unlabelled data.
Supervised machine learning is divided into two categories;
- Classification – predict a category an item belongs to e.g dog breed.
- Regression – predict a numeric value e.g person’s height.
Unsupervised machine learning.
The algorithm creates models for data without pre existing labels to train on e.g. music recommendations systems. Group likely similar items.
Reinforcement machine learning.
Trains algorithm based on taking actions and receiving rewards for those actions e.g. self driving cars, npc.
Deep learning
Can be used for all machine learning types above. But has the limitations
- Requires a lot of data.
- Reguires a lot of computing power.
- Most decisions cannot be understood why they were made.
TensorFlow and Scikit-learn
Linear Regression.
Using line of best fit to predict value of items based on previous values.
